Object Detection Guide
Model Creation
To start, download our GitHub repository, where you can find the object detection model's code, as well as their scripts necessary for its training and converstion to a compatible format with the Hailo 8. To do so, we recommend to head to the documentation's next section GitHub, where we explain all of the different ways you can download the repository, like downloading the .zip folder or by just cloning the repository with Git.
After downloading the repository, head to the folder devices/raspberry-pi-5/src, where you can find all of the code used by the Raspberry Pi 5, which can be done with the following command:
cd devices/raspberry-pi-5/src
Warning
To make sure said command works properly, the route must be relative to the folder where the cloned repository is. In the case it's not in the repository's root folder, the route must be modified accordingly.
Afterwards, move to the yolo/scripts folder:
cd yolo/scripts
Create a Python virtual environment with the following commands:
- If the operating system is Windows:
cmd python -m venv .venv ./.venv/Scripts/activate pip install -r requirements.txt - If the operating system is Linux:
bash
    python -m venv .venv
    source .venv/bin/activate
    pip install -r requirements.txt
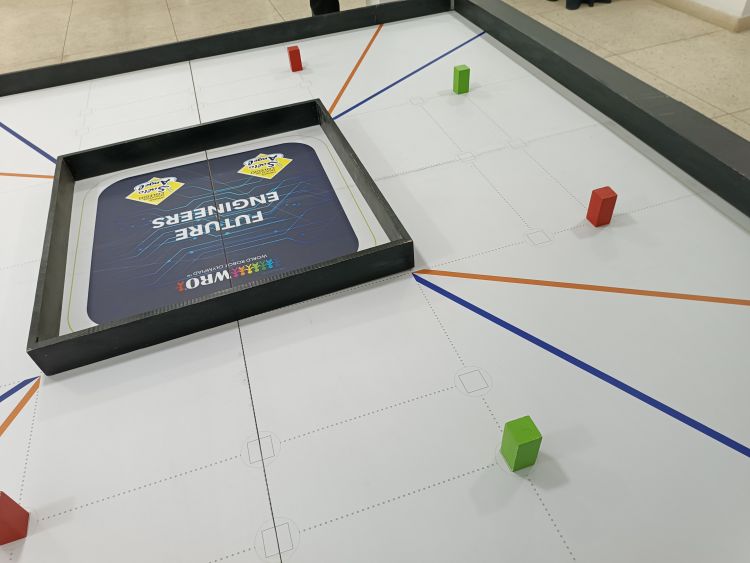
To create the dataset, we took images of the prisms that will be used in the competition. These images were taken from multiple devices, in different light conditions and angles, these images are saved in the folder yolo/dataset/general/original/to_process.
Then we run the script yolo/scripts/resize.py to resize all of the images to 640 x 640 pixels, which is the input size for the YOLOv11 model. This script uses the OpenCV library to resize the images and save them in the yolo/dataset/general/resized/to_process.
 Non-resized image from dataset
 Resized image from dataset
Afterwards, the images were annotated, where the prisms were labeled with their respective colors. To do so, we used Label Studio, a data labelling open-source tool that allows to create custom datasets to train Deep Learning models automatically.
Warning
If the number of images to label is big enough, Label Studio will return an error The number of files exceeded settings.DATA_UPLOAD_MAX_NUMBER_FILES. To fix this, if Label Studio is installed as a Python package, you can modify the file settings.py which is located in the folder label_studio/core/settings.py, change the value of DATA_UPLOAD_MAX_NUMBER_FILES to a number bigger than the number of images to label or None if you wish for an unlimited option. In case you can't find this file, search in the folder site-packages/label_studio/core/settings.py inside of Python's virtual environment where Label Studio was installed.
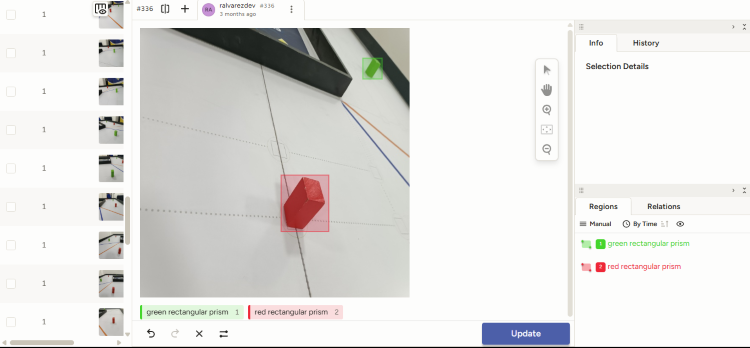 Labelling images with Label Studio
During this process, we handle data sets for 1 (G, M, R), 2 (GR), 3 (GMR), 4 (BGOR) classes, which we switched during the project's development, M comes from magenta rectangular prism, G comes from green rectangular prism, R comes from red rectangular prism, B comes from blue line and O comes from orange line. Initially, we tried to build a 4-class model, however, it didn't meet our performance standards, aside from
including the green and red prism, it also included the blue and orange line, however, since we knew which way to turn thanks to the RPLiDAR C1's measurements, we decided to omit the classes for the blue and orange lines, since they weren't really needed. Afterwards, we built a 2-class model, which was capable of detecting the red and green prisms. Right after, we built a 3-class model, this extra class is to detect the magenta prism, to properly detect the parking spot. Then, we opted to use 2 models, one with two classes (GR), to detect the game field obstacles, and a 1-class model (M) to detect the parking spot after completing all of the tasks. Finally, due to certain optimization issues with the Hailo 8, we just used 3 models with just 1 class each (G, M, R), with this, each model was capable of detecting their respective prism, we simply used one model or the other according to what is required in the challenge.
Now, we will explain the steps necessary to assemble the object detection models, we will use the 1-class model (G) as an example, however, the steps are essentially the same for the other models, just change the image's route and the class number.
It's worth mentioning that, just as we vary the classes number, we also vary the amount of number of images per class, from a dataset with around 350 images before doing the data augmentation, to a dataset with about 1300 images before doing the data augmentation, where each image was labeled manually by a team's member to train the model accurately.
After labelling the images with Label Studio, the labels were exported in the YOLO format and were saved in the yolo/dataset/g/labeled/to_process folder. Right after, the yolo/scripts/augment.py script was run to generate roughly 10 augmented images per unaugmented image, using the library OpenCV. This script applies differet changes to the images, such as rotation, scaling, translation, brightness and contrast, to increase the variety of the data set and increase the model's performance. Finally, run the script yolo/scripts/after_labeling.py to move the images from the yolo/dataset/g/augmented folder to the yolo/dataset/g/labeled/processed folder.
Afterwards, run the script yolo/scripts/split.py to separate the data set into a training set yolo/dataset/g/organized/train, a validation set yolo/dataset/g/organized/val and a test set yolo/dataset/g/organized/test with a distribution around 70%, 20% and 10%, respectively. This script uses the library os to create the necessary folders and move the images to the corresponding folders, however it will not modify or delete the folders yolo/dataset/g/labeled/to_process and yolo/dataset/g/labeled/processed.
Note
You can observe, that, inside each of the routes, you can find the to_process folder, this is just a temporary folder that is used to save the images that are being processed. Once the images are processed, the files inside of them are moved to their corresponding processed folder, which is located in the same route. This way, we avoid that the processed images get mixed up with the unprocessed image, while keeping the door open to train the same model, without needing to process the same images. Also, you can observe that both for augmented and organized, the to_process folder doesn't exist, because, after these images are processed, they are deleted because of the large number of them at the moment of doing the data_augmentation.
Model Training
 Image with different infrerences made (GMR model)
First, depending on the model and the way it's gonna be trained, a .yaml file has to be modified, which are located inside of the folder yolo/data. Modify the image's route and the labels to the corresponding routes. In this case. we have to modify the g.yaml file for the 1-class model, whose parent folder will vary between colab and local depending on the environment.
Note
At the moment of cloning this repository, we provide template files for the .yaml, these end in yaml.example. After you modify them, their extension has to be reverted back to a .yaml file.
There are two ways of training a model depending on the resources available in the moment:
- Local Training: To do this, you need to have a GPU dedicated exclusively to training the model.
- In this case, run the script
yolo/scripts.train.pyto train the YOLOv11 model. This script uses the library Ultralytics to train the model and save the weights in the folderyolo/v11/runs/g.
- In this case, run the script
- Remote Training: To do this, you can use Google Colab, where you can use a GPU for free or for a fee, depending on the time required for training and how fast you want the training to be done in.
- In this case, run the script
yolo/scripts/zip_to_train.py, which will create a compressed file with the data set, which will be moved to the folderyolo/v11/zip. - Later, we upload the file to Google Drive, change the visibility to
Anyone with the link can viewand copy the ID of the compressed file, which is found in its URL. We paste this link in the corresponding section of Jupyter Notebookyolo/v11/notebooks/colab/g_train.ipynbto be able to download the compressed file in Google Colab. - Select the runtime environment according to the availability. You can use a NVIDIA Tesla T4 GPU for free for roughly 5 h daily, or buying 100 credits (which cost around $10 at the time of writing this guide) from this platform to use it for longer and/or using better GPUs. In our case, we used a NVIDIA Tesla L4, which consumed 6 credits to train a complete model.
- Run the Jupyter Notebook sections
yolo/v11/notebooks/colab/g_train.ipynb, omitting the aforementioned section related to the decompression of the compressed file. This Jupyter Notebook uses the library Ultralytics to do the model's training and save the weights in the folderyolo/v11/runs/g. - Once the training is done, you can download the compressed file with the weights of the model from Google Drive and decompress it in the folder
yolo/v11/runs/glocally.
- In this case, run the script
- Inference: Run the script
yolo/scripts/test.pyto do the trained model's inference and evaluate the model's performance with images it hasn't seen. This script generates images with the inferences made by the model, where the bounding boxes and labels are shown for each detected object. - ONNX: Run the script
yolo/scripts/export.py, and change the model's format toonnx, which is an open format used to represent Machine Learning models in an interoperable way between different frameworks, tools, among others [2]. - Clean-up: Finally, run the script
yolo/scripts/after_training.pyto delete the folderyolo/dataset/g/organized/val, because these will not be needed for further steps. Also, it will move the content from the folderyolo/dataset/g/organized/train/imagesto the subdirectory inhailo/suite/train, to delete the first one. Also, so that the model can be converted to a format compatible with Hailo 8, it will move the best-performingONNXformat weights corresponding to the model.
Tip
In the ocurrence that you are using Google Colab and the session disconnects in the runtime environment during the model's training, you can resume the training by modifying the model route or the name of the model to use in the Notebook's function train_model by the route where the best training weights were saved, in our case: g_to_train/yolo/v11/runs/m/weights/best.pt.
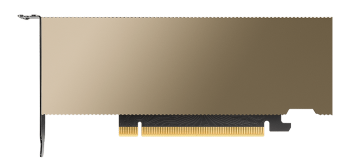 NVIDIA Tesla L4 GPU Front View
Important
During this section, YOLO's version 11 is mentioned, since we used this version, but, in the same way as we mentioned the data set G for didactic purposes, you can use any YOLO version, and any dataset, since the process is essentially the same. However, it is recommended to use YOLOv11, because it's the most recent version (at the time of writing) and has significant upgrades compared with previous versions.
Model Conversion
To convert the model to a compatible format with the Hailo 8, we require using Docker (but it is not essential), to create a container with all the necessary packages for its proper functioning.
When installing the AI HAT+, run the command hailortcli fw-control identify, where you noticed the following line:
Firmware Version: 4.20.0 (release,app,extended context switch buffer)
As you can observe, in our case, our firmware version is 4.20.0, which is why we have to make sure that the Dataflow Compiler, is compatible with this version. For example, due to a certain change in the Dataflow Compiler for the 3.31.0 version, where different mechanisms for the error detection are different, the HailoRT's older versions (before 4.21.0) will not be capable of executing compiled HEF files due to DataFlow Compiler's new version [3]. We recommend checking out the Compatibility Table, to know which packages' versions to install to avoid compatibility issues.
First, visit Hailo's official page, where you have to create an account, log in, and head on the developer zone. Here, select the software download section, and download the necessary packages [1]
- HailoRT, for the architecture where Docker is being run on (in our case,
amd64). Recommended version: 4.20.0. - HailoRT Python package (whl), for the architecture where Docker is being run on (in our case, x86_64), and the Python container version (if its not being modified, it has to be the version 3.10). Recommended version: 4.20.0.
- Hailo Dataflow Compiler, for the architecture Docker is being run on (in our case,
x86_64). Recommended version: 3.30.0.
Important
If you are using a NVIDIA GPU to optimize the .har format, you also have to install the NVIDIA Container Toolkit
Important
If you can't find any of the packages, inside the section to download Hailo software, there are two ways to search the packages: Latest releases and Archive; the first one is the predetermined. If you can't find the respective package in Latest releases, it probably is in Archive.
Then, we switch directories:
- If you have a GPU, go to the directory
hailo/suite/dockerfiles/gpu, with the command:
bash cd hailo/suite/dockerfiles/gpu - If you don't have a GPU, go to this directory instead:
hailo/suite/dockerfiles/no-gpu.
bash
    cd hailo/suite/dockerfiles/no-gpu
Either way, there should be a file named Dockerfile, indifferent from which folder are we in.
To create the Docker image, run the following command:
docker build -t hailo_compiler:v0 .
Wait until all dependencies are installed and the container's Docker image is ready.
Afterwards, initialize the Docker container:
-
In case you have a GPU:
bash docker run -it --name compile_onnx_file --gpus all --ipc=host -v {path}:/home/hailo/shared hailo_compiler:v0 -
In case you don't have a GPU:
bash
    docker run -it --name compile_onnx_file --ipc=host -v {path}:/home/hailo/shared hailo_compiler:v0
Note
Replace path with the absolute route for hailo/suite.
Inside of the container, move to the directory /home/hailo/shared/libs:
cd /home/hailo/shared/libs
In the same terminal, create a Python Virtual Environment:
python -m venv .venv
source .venv/bin/activate
Now install the pacakges previously downloaded, which are found inside the folder hailo/suite/libs. For the versions downloaded, run the following command:
dpkg -i hailort_4.20.0_amd64.deb
pip install  hailort-4.20.0-cp310-cp310-linux_x86_64.whl
pip install hailo_dataflow_compiler-3.30.0-py3-none-linux_x86_64.whl
Clone this GitHub repository, it all the necessary files to convert the model from ONNX format to HEF:
git clone https://github.com/hailo-ai/hailo_model_zoo.git
However, since we need the 2.14 version, the command would be the following:
git clone -b v2.14 https://github.com/hailo-ai/hailo_model_zoo.git
Move from the current directory to the hailo-model-zoo corresponding:
cd hailo_model_zoo
Install all the required dependencies:
pip install -e .
Warning
If you get an error like:
bash
ERROR: pip's dependency resolver does not currently take into account all the packages that are installed. This behaviour is the source of the following dependency conflicts.
tensorflow 2.12.0 requires numpy<1.24,>=1.22, but you have numpy 2.2.6 which is incompatible.
hailo-dataflow-compiler 3.30.0 requires numpy==1.23.3, but you have numpy 2.2.6 which is incompatible.
Modify the file setup.py which is found inside of the repository, and, in the line 44, inside of the main function, substitute "numpy" with "numpy==1.23.3", and in the line 46, substitute "scipy" with "scipy==1.9.3". Retry the command:
bash
pip install -e .
Check if the packages were installed correctly with the following command:
hailomz --version
Modify the model configuration file, in the field classes, establishing the number of classes that were trained with the model in questionj (for example, for the model G it would be 1):
sudo nano hailo_model_zoo/cfg/postprocess_config/yolov11n_nms_config.json
Establish the variable of the environment USER as Hailo:
export USER=hailo
Now, to convert the model to a compatible format with the Hailo 8, run the following commands:
-
First, parse the model:
bash hailomz parse --ckpt ~hailo/shared/v11/g/best.onnx --hw-arch hailo8 yolov11n mv yolov11n.har g_parsed.har -
Second, optimize the model:
bash hailomz optimize --har g_parsed.har --classes 2 --calib-path ~hailo/shared/train --hw-arch hailo8 yolov11n mv yolov11n.har g_optimized.har -
Finally, compile the model:
bash
    hailomz compile --har g_optimized.har --hw-arch hailo8 yolov11n
    mv yolov11n.hef g_compiled.hef
wait until the previous step is completed, and we can have our custom and Hailo 8 compatible model ready.
To move all of the files generated in the directory hailo/suite/libs/hailo_model_zoo to the folder with the corresponding model's weights, run the script yolo/scripts/after_hailo_compilation.py.
Finally, to exit the Docker container, run the following command:
exit
Model Test
After completing all of the previous steps, move to the folder hailo/suite/libs, and clone the following repository:
git clone https://github.com/hailo-ai/hailo-rpi5-examples.git
Change the directory again, move to hailo-rpi5-examples, with the following command:
cd hailo-rpi5-examples
Run the following command to install all of the necessary dependencies:
./install.sh
Now, every time you open a new terminal, run the following command:
source setup_env.sh
In this moment, we can test that everything is working correctly, like the model's precision:
-
If you have a camera with a CSI port compatible with the Raspberry Pi, after connecting it, run the following command:
bash python basic_pipelines/detection.py --input rpi --labels-json ../labels/g.json --hef-path ../../v11/runs/g/weights/compiled.hef -
If you don't have a camera hwoever, you can use the following command to test the model with a test image:
bash
    python basic_pipelines/detection.py --input {image} --labels-json ../labels/g.json --hef-path ../../v11/runs/g/weights/compiled.hef
Note
Substitute image with the test image's route.
This will open a window with the camera, where it will show the bounding boxes and the labels of the detected objects. If everything is working correctly, we should see the objects being detected in real time.
References
-
d'Oleron, L. (April 23rd, 2025). Custom dataset with Hailo AI Hat, Yolo, Raspberry PI 5, and Docker. Medium. https://pub.towardsai.net/custom-dataset-with-hailo-ai-hat-yolo-raspberry-pi-5-and-docker-0d88ef5eb70f
-
ONNX. (2025). ONNX. https://onnx.ai/
-
2025-04 | Hailo. (2025). Hailo. https://hailo.ai/developer-zone/documentation/hailo-sw-suite-2025-04/?sp_referrer=suite/suite_changelog.html